Mini Tepig Amigurumi by Strings Away
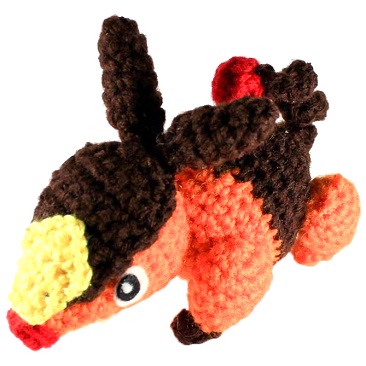
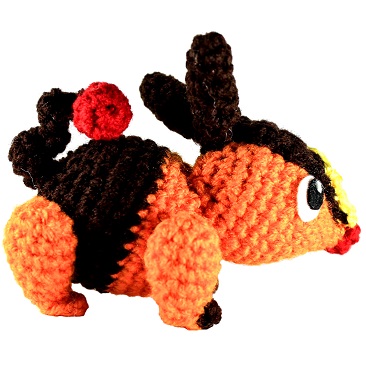
Get ready to heat up your team with this free pokemon crochet pattern of Tepig! This cute little piggy is headed to the gym, not the market. Happy crocheting!

Prefer to print a pdf pattern? Click here to buy one in my shop! Want to buy a completed Tepig? Click here!
Materials
- yarn: orange, dark brown, red, yellow
- 3.5 mm crochet hook
- fiber-fill stuffing
- Scissors, yarn needle for assembly
- black and white felt for eyes
Abbreviations
-R(#): Round number
-MR: magic ring
-ch: chain
-tch: turn chain
-Sc: single crochet
-Dc: double crochet
-Inc: increase (2 sc in same stitch)
-dec: decrease (decrease 2 sc into one)
I recommend using Invisible Decrease

-sl st: slip stitch
– f/o: fasten off
Check out my Learn to Crochet page for video tutorials on how to do the types of stitches listed above.
Body
Using orange:
R1. 6 sc in MR (6)
R2. Inc around (12)
R3. ‘Sc 1, inc’ around (18)
R4. ‘Sc 2, inc’ around (24)
R5. ‘Sc 7, inc’ around (27)
R6-8. Sc around (27) 3 times
Switch to brown yarn
R9. Sc around (27) 3 times
R10. ‘Sc 7, dec’ around (24)
R11. ‘Sc 2, dec’ around (18)
R12. ‘Sc 1, dec’ around (12)
R13. Dec around (6)
Continue on to tail:
Chain 16. In 2nd chain from hook: ‘Inc, sc 2’ until end (5 times total.) F/o and then sew end of tail to cover hole at back of body.

Head
Using orange:
R1. 6 Sc in MR (6)
R2. Sc 1, Inc, Sc 2, Inc, Sc 1 (8)
R3. Sc around (8)
R4. Sc 1, Inc, Sc 4, Inc, Sc 1 (10)
R5. Sc1, Inc, Sc 6, Inc, Sc 1 (12)
R6. ‘Sc 1, inc’ around (18)
R7. Sc around (18)
R8. ‘Sc 2, inc’ around (24)
R9-R13. Sc around (24) 5 times
R14. ‘Sc 2, dec’ around (18) Don’t forget to add stuffing
R15. ‘Sc 1, dec’ around (12)
R16. Dec around (6) f/o.
Back Legs
Using orange -Make 2:
R1. 6 sc in MR (6)
R2. Inc around (12)
R3-4. Sc around (12) two times
R5. ‘Sc 4, dec’ around (10)
R6. Sc around (10)
R7. Dec around (5)
R8. Sc around (5)
Continue to foot:
Sc, ch 1, dc, ch1, sc. f/o
Front Arms
Using orange- make 2:
R1. 6 sc in MR (6)
R2. Inc around (12)
R3-4. Sc around (12) two times
R5. ‘Sc 4, dec’ around (10)
R6. Dec around (5)
Switch to brown yarn:
Sc, ch 1, dc, ch1, sc. f/o
Head Stripe
Using Dark brown:
Row 1: Ch 2, tch (2)
Row 2: Sc 2, tch (2)
Row 3: Inc, Sc 1, tch (3)
Row 4: Sc 3, tch (3)
Row 5: Sc 1, inc, Sc 1, tch (4)
Row 6: Inc, Sc 2, Inc tch (6)
Row 7: Sc 6, tch (6)
Row 8: Inc, Sc 4, inc, tch (8)
Row 9: Sc 8, tch (8)
Row 10: Dec, sc 4, dec, tch (6)
Row 11: Sc 2, Dec, Sc 2, tch (5)
Row 12: Sc 1, Dec, Sc 2 (4) f/o.
Tail Ball
Using Red:
R1. 6 Sc in MR (6) f/o
R2. Inc around (12)
R3. Dec around (6)
Ears
Using brown:
R1. 6 Sc in MR (6)
R2-5. Sc around (6) 4 times
R6. Dec around (3)
Nose
Using Red:
R1. 6 Sc in MR (6) f/o.
Yellow Nose Stripe
Using yellow:
Row 1: Ch 2, tch (2)
Row 2: Sc 2, tch (2)
Row 3: Sc 1, inc, tch (3)
Row 4: Sc 2, inc, tch (4)
Row 5: Sc 3, inc, tch (5)
Row 6: Sc, hdc, [ch1 dc ch1 dc] , hdc, sc. f/o.
[] = all in same scAssembly of Crochet Tepig
Attach the tail ball to the end of the cork-screw tail. Attach the back legs to the back of the body (over the brown half) and the front legs to the front half (orange half.) Onto the head: attach the dark brown head stripe across the top of the head. At the back of this stripe attach the ears. Attach the red nose to the front and touching the front edge of the nose stripe. Finally attach the yellow stripe at the front of the snout – touching the top of the red nose.
I hope you enjoy your Tepig Amigurumi!
Thank you for trying this pattern – I hope you enjoy your Amigurumi Tepig!
Click here to purchase a downloadable pdf version of this crochet pattern
This pattern by StringsAway is for personal use only. Please do not sell or redistribute the pattern as your own.
