
Every December, I get hit with that festive feeling. It’s time to bust out the decor- and I don’t just mean the tree. I have Christmas-themed candle sticks, oven mitts, cookie jars, towels, table cloths, snowmen, reindeer, and more besides! This year I decided to Christmas-ify some Pokemon to add to the decorative chaos.
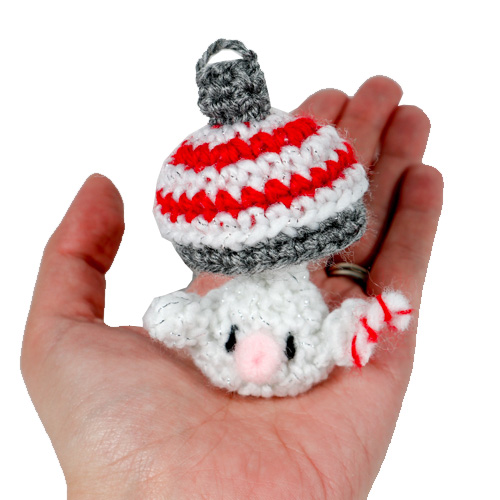
First up is Foongus, who has turned into some sort of Christmas hat/ Ornament/ Candy-cane inspired mash-up. The pattern is identical to the normal Foongus pattern, but with different color changes, and an ‘ornament top’ instead of a pokeball button.
By the way- this pattern makes adorable Christmas mushrooms as well, if you just skip the arms, ornament cap, and facial details!
Materials
- Yarn: red, white sparkle, grey
- 3.5 mm crochet hook – fiber-fill stuffing
- Felt: pink (for nose), black (for eyes)
- Scissors, yarn needle for assembly

Abbreviations
R(#): Round number
MR: magic ring
Sc: single crochet
Inc: increase (2 sc in same stitch)
Dec: decrease (decrease 2 sc into one)
I recommend using Invisible Decrease
Sl st: slip stitch
f/o: fasten off
Check out my Learn to Crochet page for video tutorials on how to do the types of stitches listed above.
Body
Same as the ‘regular Foongus’ but using White Sparkle yarn:
R1. 6 sc in MR (6)
R2. ‘Sc 1, inc’ around (9)
In back loops only:
R3. ‘Sc 2, inc’ around (12)
Continue as usual (crocheting in both loops):
R4. ‘Sc 1, inc’ around (18)
R5. Sc around (18)
R6. ‘Sc 4, dec’ around (15)
R7. ‘Sc 3, dec’ around (12)
R8. Dec around (6)
R9. Sc around (6).
Do not close, f/o.
Arms
These are also the same as regular Foongus. Make 2- using white sparkle:
R1. 3 sc in MR (3)
R2. Sc 2, Inc (4)
R3. Sc around (4)
F/o, leave a tail for sewing. f/o
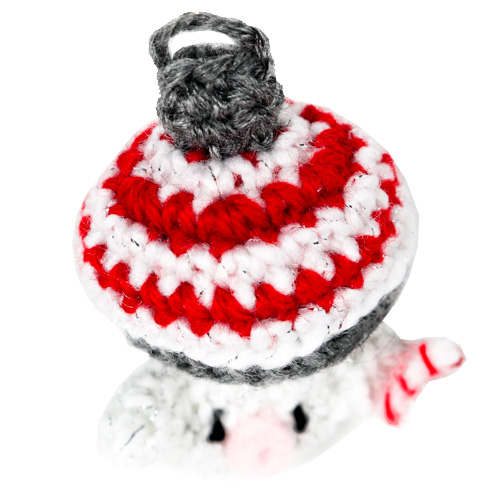
Striped Mushroom Cap
To begin, you will be alternating between red and white sparkle with each row.
R1. Red: 6 sc in MR (6)
R2. White: Inc around (12)
R3. Red: ‘Sc 1, inc’ around(18)
R4. White: ‘Sc 2, inc’ around(24)
R5. Red: Sc around (24)
R6. White: Sc around (24)
R7. Grey: In back loops only: Sc around (24)
R8. In front loops only: Sl st around (24) F/o and weave in the grey yarn.
Close the under-side of the mushroom cap as follows:
With white sparkle yarn, join onto the unworked (back) loops of R8:
R9. ‘Sc 2, dec’ around (18)
R10. ‘Sc 1, dec’ around (12)
R11. Dec around (6)
The opening does not need to be closed. Stuff well.
Ornament Cap
Using grey:
R1. 6 sc in MR (6)
In back loops only:
R2. Sc around (6)
R3. (In both loops/as normal) Sc around (6.)
F/o, leave a tail for sewing. Tie a small piece of yarn to both ends of the top of the cap- to mimic the bar that an ornament hook would be attached to. Hide the ends inside of the work.
Assembly of Crochet Christmas Foongus
Sew the ornament cap onto the top of the mushroom cap. Attach the top of the body to the underside of the cap using whip stitch. Attach the arms to either side of the body.
Facial details were added using needle felting and unwound yarn ends/yarn fibers. The candy-cane pictured was made by needle felting unwound yarn ends – but I would strongly advise just using twisted white and red pipe-cleaner pieces instead. Needle felting that little candy cane was difficult and will never be repeated again!
I hope you enjoy your Christmas Foongus Amigrumi!

Thank you for trying this pattern – Merry Foongus!
This pattern by StringsAway is for personal use only. Please do not sell or redistribute the pattern as your own.