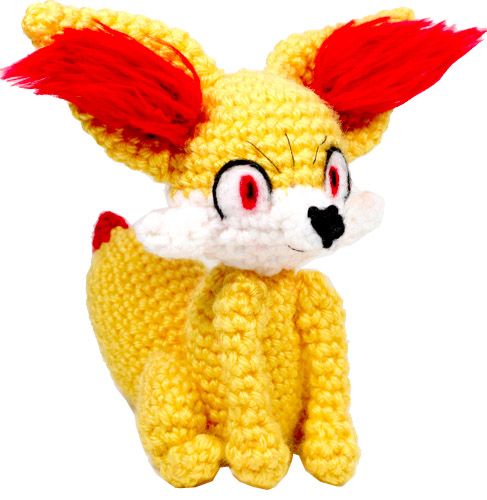
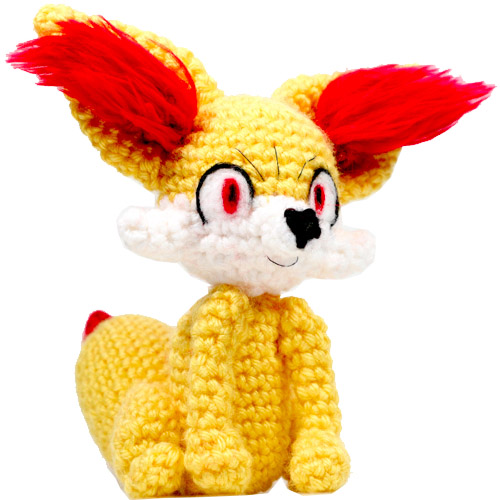
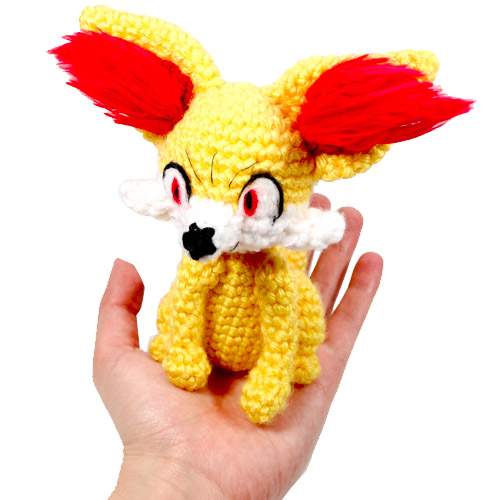
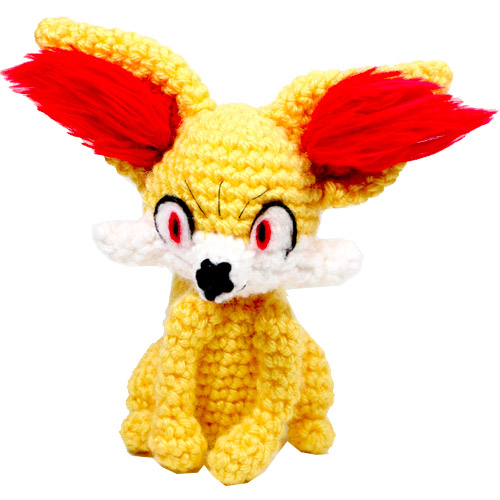
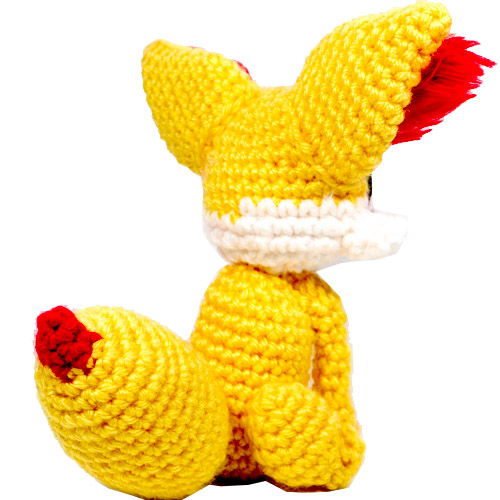
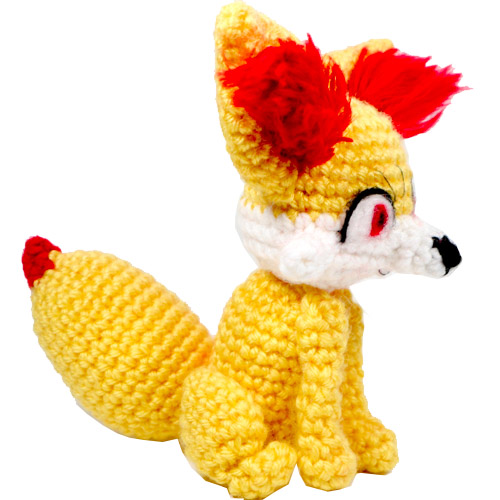
Here’s a little FireFox and I’m not talking about the internet browser. It’s Fennekin, the fire type starter from Kalos region! With fluff-glam ears and an oversized head, she’s a cute diva. Crochet your own Fennekin today!
This is a small palm-sized Fennekin that sits approximately 6″ x 5″ inches when complete.
Materials
- Yarn: Yellow, Red, White, Black
- 3.5 mm crochet hook – fiber-fill stuffing
- Felt: Red, white, black (for the eyes), felting needle if desired
- Scissors, yarn needle for assembly
Abbreviations
R(#): Round number
MR: magic ring
Sc: single crochet
Inc: increase (2 sc in same stitch)
Hdc: half double crochet
Dec: decrease (decrease 2 sc into one) I recommend using the Invisible Decrease
f/o: fasten off
Check out my Learn to Crochet page for video tutorials on how to do the types of stitches listed above.
Rows are worked in continuous rounds. Instructions between apostrophes: ‘ ‘ are repeated as many times in the round as indicated. This pattern assumes that you stuff body parts as they are made before closing.
Fennekin Crochet Pattern by StringsAway
Head
Begin with Yellow:
R1. 6 sc in MR (6)
R2. Inc around (12)
R3. ‘Sc 1, inc’ around (18)
R4. ‘Sc 2, inc’ around (24)
R5. ‘Sc 7, inc ‘ around (27)
R6-9. Sc around (27) four times
Switch to white
R10. Sc around (27)
R11. ‘Sc 7, dec’ around (24)
R12. ‘Sc 6, dec’ around (21)
R13. ‘Sc 1, dec’ around (14)
R14. Dec around (7)
F/o, close loop.
Body
Using Yellow:
R1. 6 sc in MR (6)
R2. Inc around (12)
R3. ‘Sc 1, inc’ around (18)
R4-14. Sc around (18) eleven times
R15. ‘Sc 1, dec’ around (12)
R16. Dec around (6)
Legs
Using Yellow:
R1. 6 sc in MR (6)
R2. ‘Sc 2, inc’ around (8)
R3. ‘Sc 3, inc’ around (10)
R4. ‘Sc 4, inc’ around (12)
R5. Sc around (12)
R6. Dec around (6)
F/o and close loop.
Feet
Using Yellow:
R1. 4 sc in MR (4)
R2. ‘Sc 1, inc’ around (6)
R3. Sc around (6)
R4. ‘Sc 1, dec’ around (4)
F/o and close loop.
Arms
Using orange:
R1. 6 sc in MR (6)
R2. Sc 2, inc, inc, Sc 2 (8)
R3. Sc around (8)
R4. Dec around (4)
R5-9. Sc around (4) five times
R10. ‘Sc 1, inc’ around (6)
R11-12. Sc around (6) two times
Close loop and f/o.
Ears
Using yellow:
R1. 4 sc in MR (4)
R2. ‘Sc 1, inc’ around (6)
R3. ‘Sc 2, inc’ around (8)
R4. ‘Sc 3, inc’ around (10)
R5. ‘Sc 4, inc’ around (12)
R6. ‘Sc 5, inc’ around (14)
R7. ‘Sc 6, inc’ around (16)
R8. ‘Sc 7, inc’ around (18)
R9-11. Sc around (18) three times
F/o, leave a tail for sewing to head.
Tail
Begin with red:
R1. 4 sc in MR (4)
R2. ‘Sc 1, inc’ around (6)
Switch to yellow:
R3 ‘Sc 2, inc’ around (8)
R4. ‘Sc 1, inc’ around (12)
R5. ‘Sc 1, inc’ around (18)
R6.. ‘Sc 5, inc’ around (21)
R7-8.. Sc around (21) two times
R9. ‘Sc 6, inc’ around (24)
R10-14.. Sc around (24) five times
R15. ‘Sc 6, dec’ around (21)
R16. Sc around (21)
R17. ‘Sc 5, dec’ around (18)
R18. ‘Sc 1, dec’ around (12)
R19. Dec around (6)
F/o, leave a tail for sewing to the body.
Snout
Begin with black:
R1. 4 sc in MR (4)
Switch to white:
R2. Inc, Sc 3 (5)
R3 Inc, Sc 4 (6)
F/o, leave a tail for sewing to head.
Whiskers
Make 2 – Using white:
R1. 4 sc in MR (4)
R2. Sc 2, Hdc 2 (4)
R3 Inc, Sc, Hdc, Hdc (5)
F/o, leave a tail for sewing to head.
Inner Ears
Using red:
R1. 4 sc in MR (4)
R2. Sc around (4)
R3. ‘Sc 1, inc’ around (6)
R4-5. Sc around (6) two times.
F/o, leave a tail for sewing into head and ear.
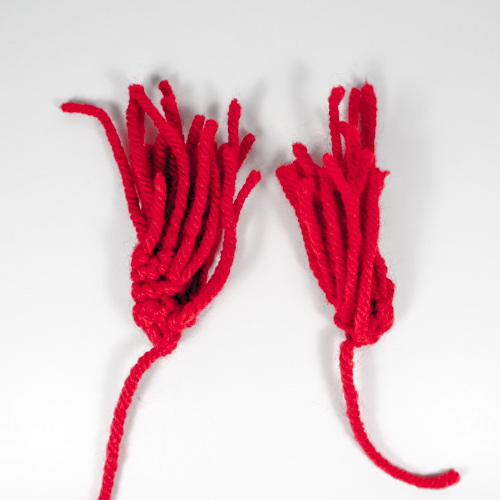
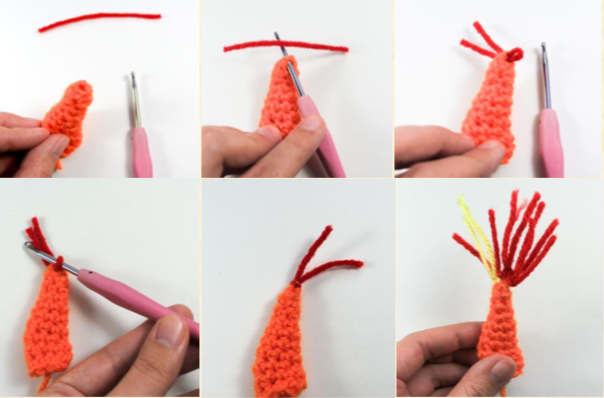
*Optional* Use latch hook and straightening technique to make the inner ears appear like hair. (See below)
Ear Flames (Optional)
Note: This picture tutorial is from the Charmander Amigurumi‘s flame tail – which is why the colors are different – but the technique is the same!
Cut several pieces of red yarn into strands of approximately 2.5 inches long. Latch hook the yarn pieces onto the inner part of the ears as shown:

Assembly of Crochet Fennekin
Assemble as shown in pictures- be sure to pin limbs in place before sewing to properly adjust position.
Legs: Attach the feet to the legs, sewing on the feet to cover the hole at the end of each leg.
Body: Pin the limbs to the body: Attach the tail to the back, the legs to the sides, and the arms above and ‘in between; the legs/feet – Fennekin is in a sitting position.
Head: On my Fennekin, I positioned the ‘jog’ from the color change of white to yellow at the very back of the head. Opposite this, within the white region, sew on the snout. To either side of the snout (and still just within the white region), sew on the whiskers. Finally, sew the ears to the top and either side of the head above the whiskers, and sew on the inner ear pieces within the ears.
The eyes were made by needle felting loose yarn ends . Alternatively, one can cut out and attach colored felt pieces. The eyebrows and mouth were made by embroidery thread and needle.
Thank you for trying this pattern – I hope you enjoy your Amigurumi Fennekin!
Watch for updates to my shop- a downloadable version of this Fennekin crochet pattern is coming soon!
This pattern by StringsAway is for personal use only. Please do not sell or redistribute the pattern as your own.