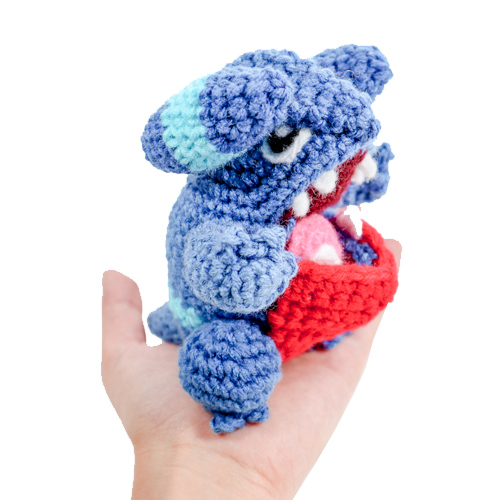
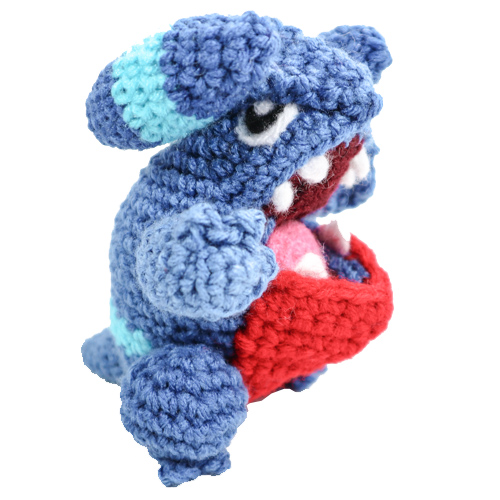
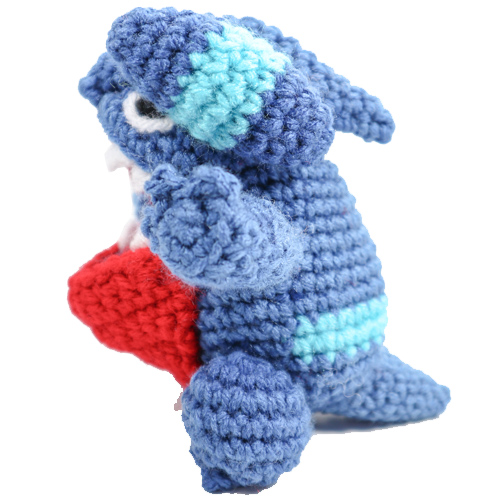
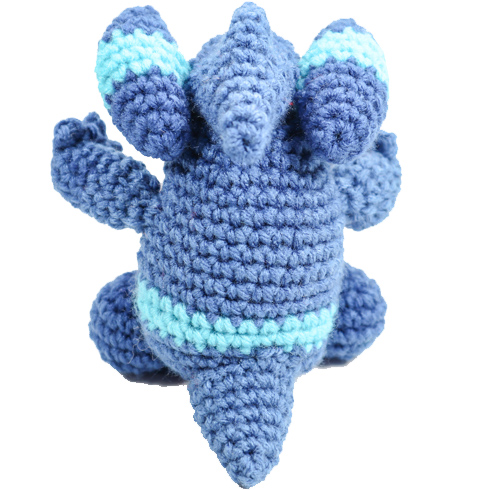
Presenting Gible, the land shark Pokemon! He resembles a huge mouth with limbs and has a forehead that’s a mix between shark and war-jet.
Gible is a ground and dragon type Pokemon. Perhaps it’s name, ‘Gible’ stems from the combo: Ground and Nibble? I’d like to take credit for all of this theorizing, but the truth is, I get my trivia from Bulbapedia.
But anyway, without further ado, here is the pattern for my Gible-inspired amigurumi!
Want to use a printed pdf copy? Buy one from my shop here!
Materials
- Yarn: dark blue, light blue, red, maroon (for inside of mouth)
- 3.5 mm crochet hook
- fiber-fill stuffing
- felt (white, black, pink) for details: eyes, teeth, tongue
- Scissors, yarn needle for assembly, felting needle if desired.
Abbreviations
R(#): Round number
MR: magic ring
Sc: single crochet
dc: double crochet
inc: increase (2 sc in same stitch)
dec: decrease (decrease 2 sc into one). I recommend the Invisible Decrease
tch: turn chain
sl st: slip stitch
ch: chain
f/o: fasten off
Check out my Learn to Crochet page for video tutorials on how to do the types of stitches listed above.
Head & Body
Begin with dark blue:
R1. 6 Sc in MR (6)
R2. Inc around (12)
R3. ‘Sc 1, inc’ around (18)
R4. ‘Sc 2, inc, around (24)
R5. ‘Sc 3, inc’ around (30)
R6. ‘Sc 4, inc’ around (36)
R7. Sc around (36)
*** If needed, see the video below demonstrating Rounds 8-21 and adding the roof and bottom of mouth ***
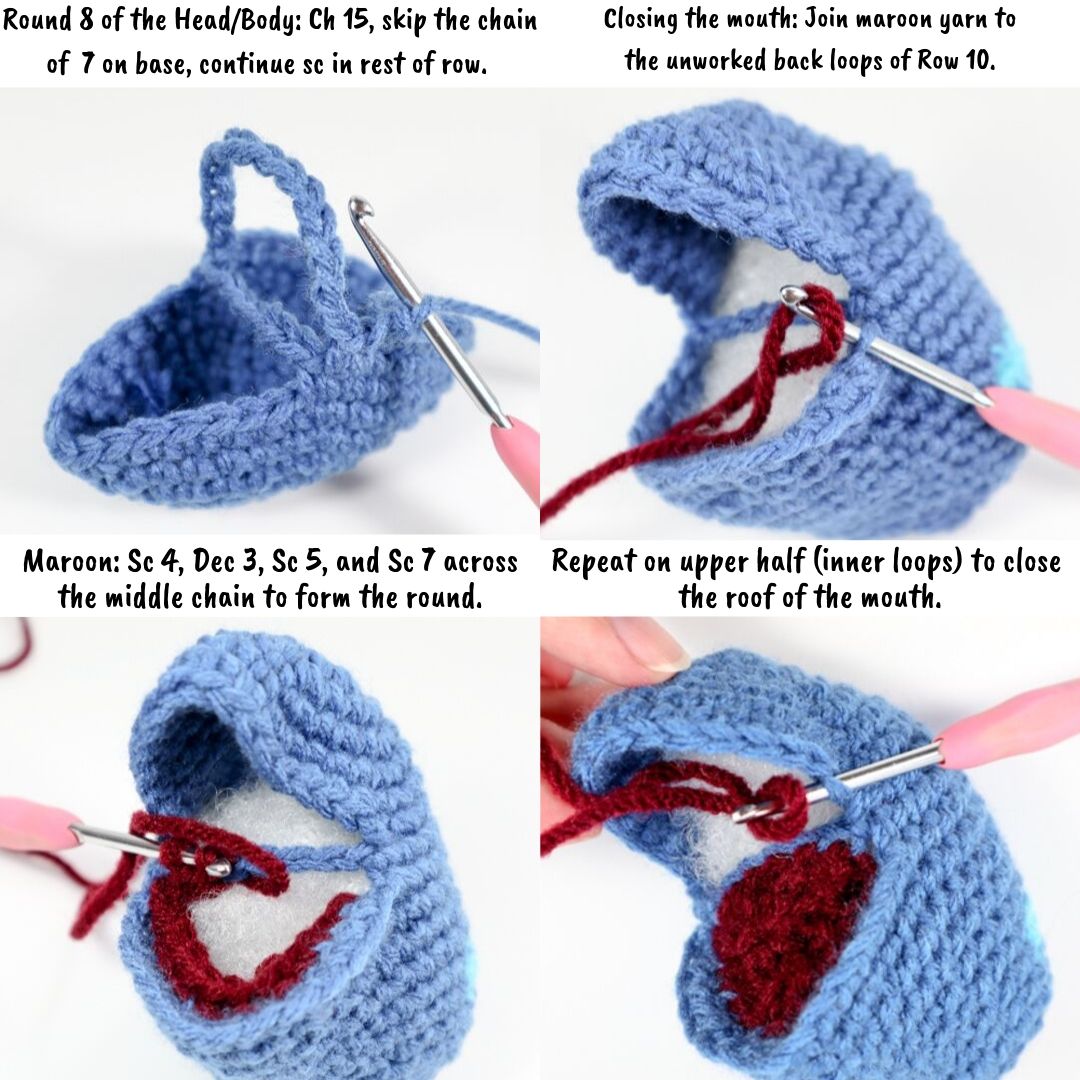
R8. Chain 7, Skip over 15 Sc’s on the base, Sc in the remaining 21 Sc of the round (28)
The space created here is the roof of the mouth and will be closed later.
R9. Chain 15, Skip over 7 Sc’s on the base, Sc in the remaining 21 Sc of the round (36) *see picture below*
The space created here is the bottom of the mouth and will be closed later.
*Note* If I could change one thing about this pattern, I would do the above ‘ch 15’ in red and used color changes in the following rows beneath it to make the jaw and tummy. If you’re an experienced crocheter and want to give it a try – now is the time!
R10. Sc around (36)
R11. Working in front loops only: Sc 15. For the rest of the round continue to Sc in both loops as usual (36)
R12. ‘Sc 3, Dec’ three times, then Sc in remaining 21 Sc (33)
R13. Sc around (33)
R14. ‘Sc 2, Dec’ three times, Sc 5. Change color to light blue. Sc 14. Change color to dark blue. Sc 2 (30)
R15. Sc 14. Change color to light blue. Sc 14. Change color to dark blue. Sc 2 (30)
R16. ‘Sc 1, Dec’ four times. Sc 18 (26)
R17. Sc around (26)
R18. ‘Sc 11, dec’ twice (24)
R19. ‘Sc 2, dec’ around (18)
By the way, you don’t have to worry about stuffing yet, as this can be done when we close the openings for the mouth
R20. ‘Sc 1, dec’ around (12)
R21. Dec around (6)
Close loop and F/o
Or please reference this video:
Closing the Mouth
First, be sure to add stuffing through the mouth into the body.
Next, locate the unworked back loops of R10 of the Body. Begin sc here with Maroon:
R1. (Along inner mouth): Sc 4, Dec 3, Sc 5, ( continue along the chain7/back of mouth) Sc 7 (19)
From here I basically just decreased around until I felt the hole was small enough to tie closed. If you’re obsessed with following instructions “to the T” you can do the following:
R2. Dec 9, skip last sc. (9)
R3. Dec 3, leave rest unworked. Close the hole.
Repeat the above instructions to ‘close’ the top of the mouth, working on the inner loops of the top. Be sure to add stuffing before closing.
Forehead Fin
Using dark blue:
R1. 4 Sc in MR (4)
R2. Sc around (4)
R3. Sc 1, Inc, Inc, Sc 1 (6)
R4. Sc 2, Inc, Inc, Sc 2 (8)
R5. Sc 3, Inc, Inc, Sc 3 (10)
R6. Sc around (10)
R7. ‘Inc, Sc 4’ twice (12)
R8. ‘Sc 3, inc’ around (15)
R9. ‘Sc 4, inc’ around (18)
R10. Sc around (18)
Add a light amount of stuffing to the back of the fin only.
R11. ‘Dec, Sc 7′ twice (16)
R12. ‘Dec, Sc 6’ twice (14)
R13. ‘Dec, Sc 5’ twice (12)
R14. ‘Dec, Sc 2’ three times (9)
R15. ‘Dec, Sc 1’three times (6)
R16. ‘Dec, Sc 1’ twice (4) F/o and close loop.
The line of ‘decreases’ from row 11- row 16 should make a ‘ridge’ along the front half of the forehead fin. I pinched the fin to make this ridge more prominent before attaching to the head. I did not stuff the front part of the fin.
Head Missiles
Make 2: Begin with dark blue:
R1. 6 Sc in MR (6)
R2. ‘Sc 2, Inc’ around (8)
R3. ‘Sc 3, Inc’ around (10)
R4. ‘Sc 4, Inc’ around (12)
Change color to light blue:
R5-R7. Sc around (12) three times
Change color to dark blue:
R8. Sc around (12)
R9. ‘Sc 4, dec’ around (10)
R10. ‘Sc 3, dec’ around (8)
Be sure to add stuffing to the missiles.
R11. ‘Sc 2, dec’ around (6)
F/o and close loop.

Arms
Make 2. Using dark blue:
R1. 4 sc in MR (4)
R2. Inc around (8)
R3. Begin working in front loops only:
Sl st onto next sc on base. chain 3, sl st onto same base.
Repeat the above twice more over the next two stitches in the round.
Working in both loops/as normal: Sc in remaining 5 unworked stitches. (8)
R4. In first 3 unworked back loops: Sc 3, then Sc in remaining stitches of round (in both loops.) (8)
R5. Sc around (8)
R6. ‘Sc 3, Inc’ around (10)
R7-R8. Sc around (10) two times.
Stuff the arms lightly.
R9. Dec around (5)
Close loop, f/o, leave a tail for sewing.
Feet
Make 2. Using dark blue:
R1. 6 Sc in MR (6)
R2. Inc around (12)
R3. ‘Sc 1, inc’ around (18)
R4-R5. Sc around (18) twice
R6. ‘Sc 1, dec’ around (12)
Be sure to add stuffing
R7. Dec around (6) Then, make the toes:
Sl st onto next sc on base. chain 3, sl st onto same base.
Repeat the above twice more over the next two stitches in the round.
Close loop, f/o, leave a tail for sewing.
Tail
Using dark blue:
R1. 4 Sc in MR (4)
R2. ‘Sc 1, inc’ around (6)
R3. ‘Sc 2, inc’ around (8)
R4. ‘Sc 3, inc’ around (10)
R5. ‘Sc 4, inc’ around (12)
R6. ‘Sc 5, inc’ around (14)
R7. ‘Sc 6, inc’ around (16)
Stuff, f/o and leave a long tail for attaching to the body (do not close opening.)
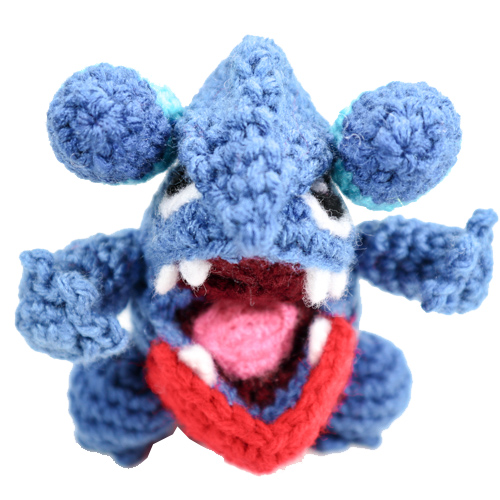
Red Jaw & Tummy
Using red, work in rows. Reference this video on working in rows and turn chains if you’re unfamiliar with this.
Row 1: Ch 2, tch (2)
Row 2: Sc 1, Inc, tch (3)
Row 3: Sc 2, Inc, tch (4)
Row 4: Sc 4 , tch (4)
Row 5: Sc, Inc, Sc, Inc, tch (6)
Row 6: Sc 6, tch (6)
Row 7: ‘Sc, inc’, repeat across the row, tch (9)
Row 8; Sc 9, tch (9)
Row 9: ‘Sc 2, inc’ repeat across the row, tch (12)
Row10-R12. Sc 12, tch (12)
F/o and leave a long tail for sewing onto the body.
Assembly of Crochet Gible
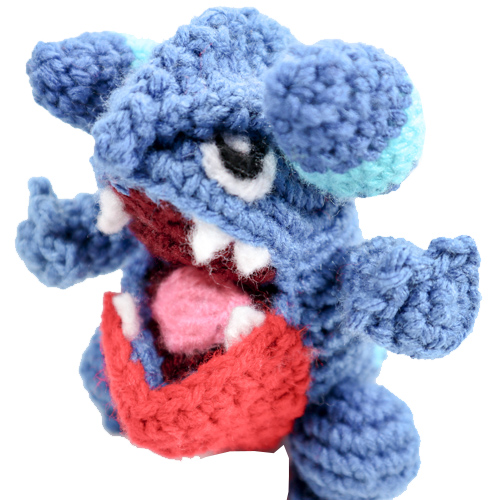
Forehead Fin: R1 of the forehead fin extends beyond the back of the head. R16 of the forehead fin reaches all the way to the front of the mouth – essentially forming a ‘nose.’ Pinch the front top piece of the forehead fin to form a ‘ridge’ above the nose and across the middle of the head. Sew on. Sew on the Head Missiles – one to each side of the forehead fin piece.
Red jaw/tummy – sew the red jaw to the front of Gible extending from the mouth to the bottom of the body. I found the extra red piece made the bottom jaw seem huge- I had to sew the edges of it (near where the arms attach) very tightly into the body to prevent it looking like Gible has a huge under-bite.
Arms, Legs, and Tail- sew on the arms, legs, and tail as shown in the pictures. Pin in place the legs and tail before sewing to ensure that Gible can stand balanced on these 3 limbs.
Facial details: the teeth, eyes, and tongue were added using needle felting loose yarn ends .
I hope you enjoy your amigurumi Gible!
Gible Gible Gible!
Thank you for trying this pattern – I hope you enjoy your Amigurumi Gible!
Click here to purchase a downloadable pdf version of this crochet pattern!
This pattern by StringsAway is for personal use only. Please do not sell or redistribute the pattern as your own.
5 Responses
María
Hello Lisa, thank you very much for the pokemon’s patterns. I love them so much!!!! I’m a Pokemon fan?
Lisa
Hello! Thank you so much for your comment! It makes me happy that other people around the world are making and enjoying the patterns. Let me know if you have any Pokémon suggestions 🙂 happy crocheting!
Megan
Hi, I love this pattern but i’m stuck at R10 on the Head & Body. Are the 36 stitches around the whole thing or do you go around the 15 chain and then the rest of the 21 again? Any help is appreciated:)
Lisa
Hi! I know that is definitely the part of the pattern where things get tricky! The “36” in R10 is made up of the Chain15+21sc.
Visually it’s like (working from head to bottom) you have just completed the top of the head (including the top of the mouth/upper mouth) by round 7. The little Ch 7 in Round 8 is like the inner most area of the mouth (“back of the tongue”) area. Now in rounds 9 and 10 you’re building the bottom part of the body and ‘lower mouth/ lower jaw.’ Let me know if you still have trouble I can maybe make a short video on the weekend if needed!
Megan
I managed to sort it thank you very much 🙂