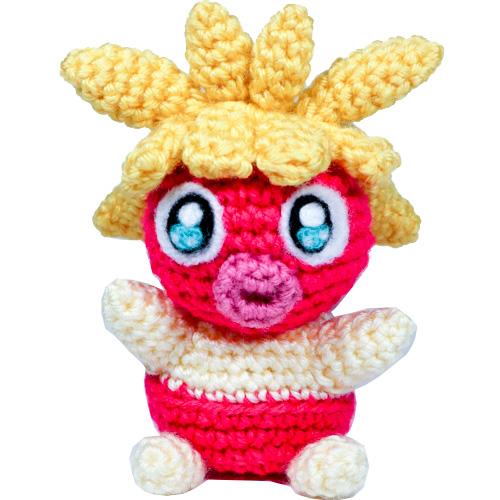
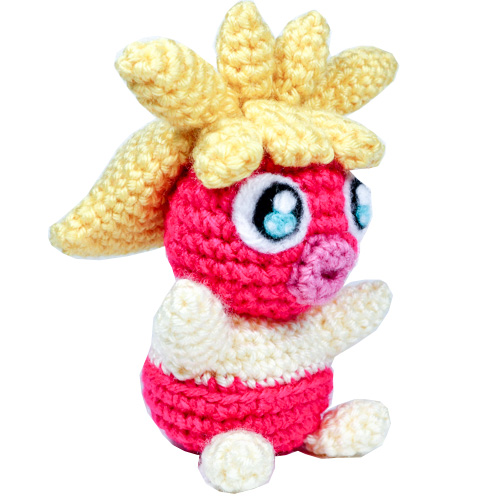
Valentines Day is just around the corner! If you’ve found that special someone, maybe you’ll give them a little Smoochum! Well now you can with this cutie free crochet pattern of baby Smoochum, the pre-evolved form of Jynx. I hope you enjoy this pattern- muah!

Materials
- Yarn: Light yellow, Yellow, Hot pink, Light pink
- 3.5 mm crochet hook – fiber-fill stuffing
- Felt or yarn ends: white, black, teal (for the eyes) and felting needle if desired
- Scissors, yarn needle for assembly
Abbreviations
R(#): Round number
MR: magic ring
Sc: single crochet
Inc: increase (2 sc in same stitch)
Hdc: half double crochet
Dc: double crochet
Dec: decrease (decrease 2 sc into one)
I recommend using Invisible Decrease
Ch: chain
Sl st: slip stitch
f/o: fasten off
BLO Back Loops Only
Check out my Learn to Crochet page for video tutorials on how to do the types of stitches listed above.

Head
Using Hot Pink:
R1. 6 Sc in MR (6)
R2. Inc around (12)
R3. ‘Sc 1, inc’ around (18)
R4. ‘Sc 2, inc’ around (24)
R5. ‘Sc 3, inc’ around (30)
R6-9. Sc around (30) four times
R10. ‘Sc 3, dec’ around (24)
R11. ‘Sc 2, dec’ around (18)
R12. ‘Sc 1, dec’ around (12)
R13. Dec around (6)
F/o and close loop.
Body
Begin with Hot Pink:
R1. 6 Sc in MR (6)
R2. Inc around (12)
R3. ‘Sc 1, inc’ around (18)
R4. ‘Sc 2, inc’ around (24)
R5. ‘Sc 3, inc’ around (30)
R6-7. Sc around (30) two times
Switch to light yellow. In R8 only, work in back loops
R8. (BLO) ‘Sc 8, dec’ around (27)
R9. Sc around (27)
R10. ‘Sc 7, dec’ around (24)
R11. Sc around (24)
R12. ‘Sc 2, dec’ around (18)
R13. ‘Sc 1, dec’ around (12)
F/o, do not close the hole, leave a tail to attach the head.

Arms
Make 2- using Light Yellow:
R1. 4 in MR (4)
R2. ‘Sc 1, inc’ around (6)
R3. ‘Sc 2, inc’ around (8)
R4. ‘Sc 3, inc’ around (10)
R5. Sc around (10)
R6. ‘Sc 3, dec’ around (8)
F/o do not close hole. Leave a tail for sewing to the body.
Feet
Make 2- using yellow:
R1. 6 in MR (6)
R2. ‘Sc 2, inc’ around (8)
R3-4. Sc around (8) two times
R4. ‘Sc 2, dec’ around (6)
F/o and close loop, leaving a tail for sewing to the body.

Hair
Using (darker) Yellow:
Begin by crocheting an oval
R1. Ch 19.
In 2nd ch from hook: Sc 17, In last ch: Inc and Sc (there are 3 sc total in the last chain.)
Continue working on other side of foundation chain: Sc 16, Inc in last chain (38)
R2. Sc around (38)
R3. ‘Dec, Sc 17’ around (36)
R4. ‘Dec, Sc 16’ around (34)
R5-8. Sc around (34) four times
R9. ‘Dec, Sc 15’ around (32)
R10. ‘Sc 6, dec’ around (28)
R11. ‘Sc 5, dec’ around (24)
R12. ‘Sc 1, dec’ around (16)
R13. Dec around (8)
F/o, press mostly flat- stuff only lightly, close by pressing flat and sewing hold shut. Leave a tail for attaching to the top of the head.

Bangs
Make 4, using (darker) Yellow:
Begin by crocheting an oval:
R1. Ch 4.
In 2nd ch from hook: Sc 2, Inc in last chain
Continue working on other side of foundation chain: Sc 2 (6)
R2. Sc around (6)
R3. Dec, Sc 4 (5)
R4. Sc around (5)
F/o, press flat, do not stuff. Leave a tail for sewing to the head.
Hair Spikes – Small
Make 2, using (darker) Yellow:
R1. 4 in MR (4)
R2. ‘Sc 1, inc’ around (6)
R3. ‘Sc 2, inc’ around (8)
R4. Sc around (8)
R5. ‘Sc 2, dec’ around (6)
R6. ‘Sc 1, dec’ around (4)
F/o, stuff, close loop, leave a tail for sewing to head.

Hair Spikes – Large
Make 2, using (darker) Yellow:
R1. 4 in MR (4)
R2. ‘Sc 1, inc’ around (6)
R3. ‘Sc 2, inc’ around (8)
R4-6. Sc around (8) three times
R7. ‘Sc 2, dec’ around (6)
R8. ‘Sc 1, dec’ around (4)
F/o, stuff, close loop, leave a tail for sewing to head.
Mouth
Using Light Pink:
R1. 5 in MR (5)
R2. Inc around (10)
R3. Sc around (10)
F/o, close loop, leave a tail for sewing to the face.
Assembly of Crochet Smoochum
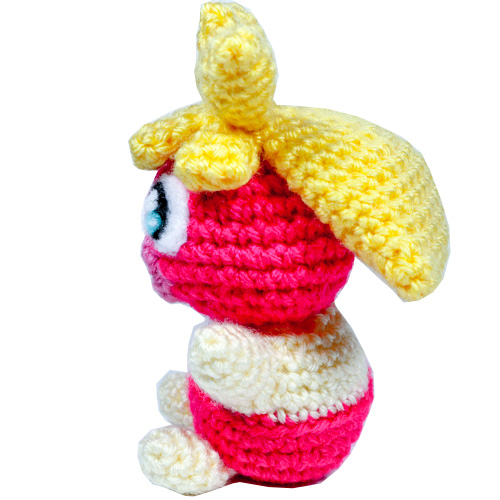
Assemble as shown in pictures- be sure to pin limbs in place before sewing to properly adjust position.
I assembled Smoochum by first attaching all parts to the head, attaching all limbs to the body, and then sewing the head onto the body last. This allows you to balance the ‘weight’ of the head (angled either slightly forward or backward over the body) such that it can sit up without falling over.
Head (again, PIN everything on before sewing it in place!): Sew the hair to the top of the head, and the four bangs opposite the hair across the forehead. There was a gap of about 1 sc width in between the hair and bangs, which is then covered up by attaching the spikes. The spikes are arranged pointing straight upward, with the two large spikes on the outer sides, and two small spikes in the centre. Lastly sew on the mouth to the front, lower half of the face. After sewing on the outer edges of the mouth, bring your needle and yarn up through the center (the ‘MR5’ part of the mouth) and back towards the face to sew the ‘MR 5’ part flat onto the face. This gives the mouth that puckered look.
Body: You will probably notice a ‘jog’ in colors where you switched from hot pink to yellow on the body. Make this ‘jog’ the back. Attach the arms to either side of the front of the body, and the feet to either side of the front. If viewed from above (with the color jog as 12 o clock) the arms and feet are placed at approximately 5 and 7 o clock positions.
Finally pin the head to the body at an angle where Smoochum can sit up without falling forward. For me the head is angled slighlty forward. Sew on.
Facial details were added by needle felting loose yarn ends .
 Squishy little Smoochum. Happy Valentines Day!
Thank you for trying this pattern – I hope you enjoy your Amigurumi Smoochum!
This pattern by StringsAway is for personal use only. Please do not sell or redistribute the pattern as your own.
